Yesterday I took a workshop through my quilt guild with the quilt artist Norma DeHaven. She was the lecturer at our last guild meeting and does some impressive stuff using freezer paper templates.
I'll admit that I wasn't so sure about the particular design we were going to make (a bit too abstract for my tastes), but was interested in the process and in supporting the guild's efforts, so I signed up to take the workshop. It was nice that the instructor provided a diagram in advance so that we could plan ahead and color in what fabrics we wanted to use where, etc. Of course, I did very little of that. Plan ahead? Color in a diagram? That requires too much work.
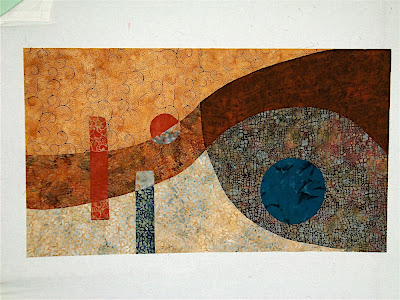
I did go to my fabric stash on Thursday night and pulled the suggested fabrics: three colors with a light, medium and dark value of each. I opted to work entirely within my existing stash (I had no time to go to the quilt shop for more fabric anyways) and took some other fabrics along with me as well, as I wasn't a true believer in the notion that this pattern required three different colors or that there had to be hard and fast distinctions between the values. I'm glad that I took those extra fabrics, as I did dig in and use some. Do you notice that one of the biggest areas - in the bottom right - is made from fabric I used as the backing to Russ and Shannon's quilt?
Preparing the template and cutting out the pieces was pretty easy, although I think we devoted way more class time to this task than was necessary. The afternoon portion of the workshop was devoted to sewing and if you pay close attention, you might realize why. See those rectangles on my finished top: they are all sewn in. Yes, sewn in, as in around a "u" to do those corners, etc. The ladies at my table - Caren, Sandi, and Diane - we all had issues with the technique taught to do this and experimented with our own. Caren came up with a pretty good one, although after I fought and fought and fought with my first seam sewn in this manner, the others flowed much more smoothly.
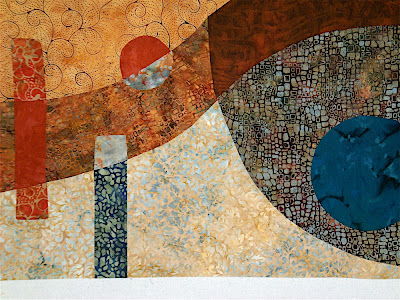
See the big circle inset at the right? She showed us a really cool technique for that requiring no pinning or matching registration marks. But it does involve a glue stick. It was pretty slick, other than I managed to catch fabric from the other side when sewing mine in and had to rip it out. Sigh. It was probably because I was in a hurry at the end of the workshop, attempting to sew it so that I wouldn't forget the process, which I think they'd showed us at Bigsby's a while back, but I'd forgotten, of course (really, how often do you inset a full circle into something else?). I'll probably forget again, and I'm sure that I can't explain the process well enough here for you (or for me). I tried Googling for other instructions to point you to, but to no avail. Just know that there is a really sweet technique out there...
I was impressed at how flat my finished project laid, given the number of curved seams and the fact that I cut it out of my fabric pretty haphazardly, with absolutely no attention to grain. Did I get lucky? Or is paying attention to all of that just overrated?
Now I have to think about how I want to quilt this... any ideas?
2 comments:
I love how the quilt came out. I would quilt it with concentric lines that parallel some of the shapes - concentric rectangles, circles, and waves. Although the blue fabric on the right makes me want to meander while the fabric in the upper left corner makes me want to mimic the curvy lines in the fabric. But I think simple repetitive lines will emphasize the shape of the fabric while maintaining the simplicity of the modern piece.
Very neat technique. You did a great job. I missed the Houston Quilt Festival this year. I was at a retreat. Anyway, take care and good luck on your projects.
Post a Comment